开始
首先推荐学习使用angr库的仓库。
环境配置
因为使用的是高贵的Arch Linux,所以要安装python模块的话只能在虚拟环境中安装。
安装miniconda
yay -S miniconda3
# 安装之后会有提示,把环境写入bash# 但是我这里用的是zsh,所以改一下路径echo "[ -f /opt/miniconda3/etc/profile.d/conda.sh ] && source /opt/miniconda3/etc/profile.d/conda.sh" >> ~/.zshrc
# 重新链接环境source ~/.zshrc# 验证condaconda info# 没问题的话执行conda init zsh 让环境常驻conda init zsh
偶尔的问题
如果出现下面报错的提示:
Error while loading conda entry point: conda-content-trust (OpenSSL 3.0's legacy provider failed to load. This is a fatal error by default, but cryptography supports running without legacy algorithms by setting the environment variable CRYPTOGRAPHY_OPENSSL_NO_LEGACY. If you did not expect this error, you have likely made a mistake with your OpenSSL configuration.)可以向.zshrc文件写入一行代码修复:
export CRYPTOGRAPHY_OPENSSL_NO_LEGACY='1' # 写之后就可以了安装angr库
pip install angr代码编写
C源码
CMake配置
cmake_minimum_required(VERSION 3.5.0)project(test VERSION 0.1.0 LANGUAGES C)
# 这里一定要把随机基址给关闭,因为我们要用到地址set(CMAKE_C_FLAGS "${CMAKE_C_FLAGS} -fno-pie -no-pie -fcf-protection=none -m32")
add_executable(test main.c)
CMake预设
{ "version": 8, "configurePresets": [ { "name": "clang_debug", "displayName": "Clang 18.1.8 x86_64-pc-linux-gnu", "description": "使用编译器: C = /usr/bin/clang, CXX = /usr/bin/clang++", "binaryDir": "${sourceDir}/out/build/${presetName}", "cacheVariables": { "CMAKE_INSTALL_PREFIX": "${sourceDir}/out/install/${presetName}", "CMAKE_C_COMPILER": "/usr/bin/clang", "CMAKE_CXX_COMPILER": "/usr/bin/clang++", "CMAKE_BUILD_TYPE": "Debug" } } ]}c代码
#include <stdio.h>#include <stdlib.h>#include <string.h>
#define USERDEF "AAAAAAAA"#define LEN_USERDEF 8
int complex_function(int value, int i) {#define LAMBDA 3  if (!('A' <= value && value <= 'Z')) {    printf("Try again.\n");    exit(1);  }  return ((value - 'A' + (LAMBDA * i)) % ('Z' - 'A' + 1)) + 'A';}
int main(int argc, char* argv[]) {  char buffer[9];
  printf("Enter the password: ");  scanf("%8s", buffer);
  for (int i=0; i<LEN_USERDEF; ++i) {    buffer[i] = complex_function(buffer[i], i);  }
  if (strcmp(buffer, USERDEF)) {    printf("Try again.\n");  } else {    printf("Good Job.\n");  }}
生成可执行文件
cmake --preset clang_debugcmake --build ./out/build/clang_debug逆向找到地址
打开ghidra,把二进制文件拖进去,找到我们想要成功执行之后的地址。
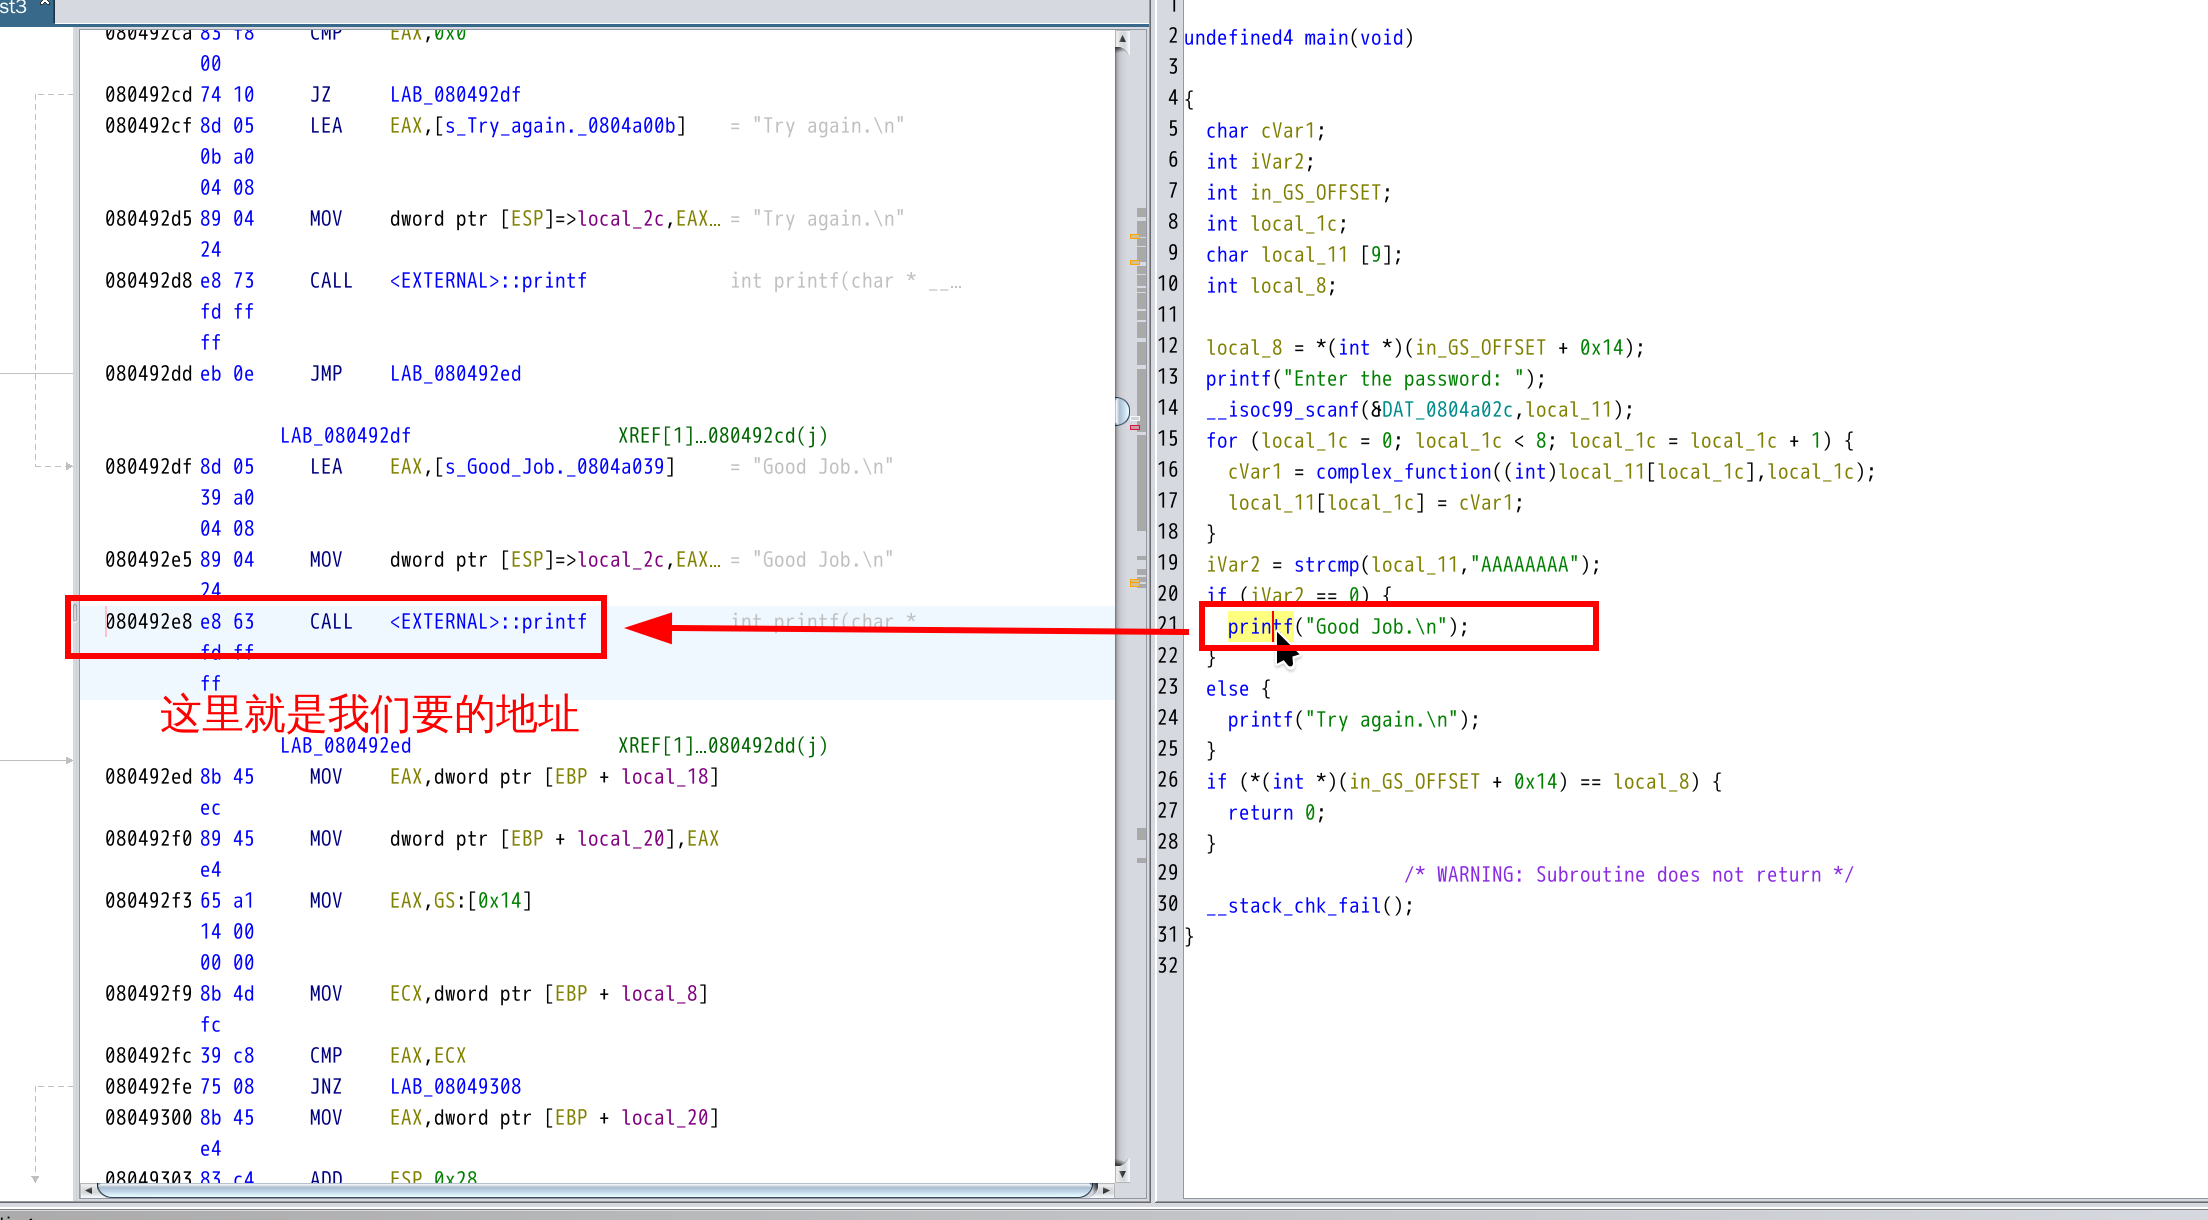
可以看到地址是0x080492e8,因为我们编译的时候已经设置了关闭随机基址,所以这个地址就是固定的。
接下来我们编写脚本。
Python脚本
import angrimport sys
def main(argv):  path_to_binary = './out/build/clang_debug/test'  # 这里填写二进制文件路径  project = angr.Project(path_to_binary)  initial_state = project.factory.entry_state(    add_options = { angr.options.SYMBOL_FILL_UNCONSTRAINED_MEMORY,                    angr.options.SYMBOL_FILL_UNCONSTRAINED_REGISTERS}  )  simulation = project.factory.simgr(initial_state)  print_good_address = 0x080492e8  # 这里填写执行成功的地址  simulation.explore(find=print_good_address)  if simulation.found:    solution_state = simulation.found[0]    print(solution_state.posix.dumps(sys.stdin.fileno()).decode())  else:    raise Exception('Could not find the solution')if __name__ == '__main__':  main(sys.argv)
执行
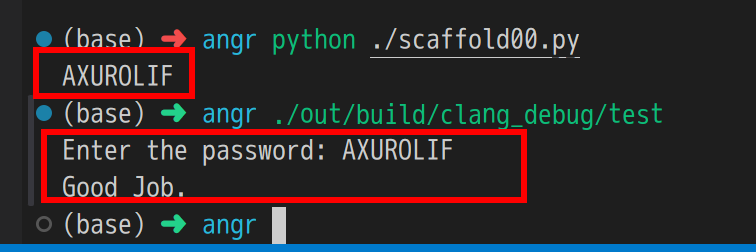
python ./scaffold00.py > AXUROLIF./out/build/clang_debug/test > Enter the password: AXUROLIF > Good Job.